Exporting Data
How data is delivered once you place an order: formats, timelines, and what to expect.

Demos & Guides
Latest Update:
July 23, 2026
How Data Delivery Works
Once you’ve placed a final DICOM order and the licensing agreement is executed:
Delivery timeline: Full DICOM files are typically available within 2 business days of contract execution. For larger orders, our team provides a specific timeline.
Supported formats:
• DICOM: Standard medical imaging format with de-identified headers
• CSV
All data has been de-identified in compliance with HIPAA Safe Harbor standards. Patient identifiers are removed from both DICOM headers and any associated clinical data.
A. Connecting to BackBlaze with AWS CLI
Before you start
Install the AWS CLI
This guide uses the AWS Command Line Interface to download your data. If you've used aws before, you can skip ahead. Otherwise, install it for your operating system:
To confirm it's installed, run aws --version. You should see something like aws-cli/2.x.x.
00
Confirm network access
Before anything else, make sure your network allows connections to Backblaze. Open your terminal and run the command below. We're testing from the terminal because that's where you'll run the AWS commands later — so if this works, the rest will work too.
Terminal
curl -sS -o /dev/null -w "HTTP %{http_code} from %{remote_ip}\n" "https://s3.us-east-005.backblazeb2.com/"
If you see this, you're good
HTTP 403 from 203.0.113.x
A 403 response means your network can reach Backblaze — the server is rejecting an unauthenticated request, which is expected. Proceed to Step 01.
If you see any of these, you're blocked
Could not resolve hostConnection timed out/Connection refusedSSL certificate problem- An
HTTP 200,302, or407(a corporate proxy is intercepting) - Hangs for more than ~30 seconds
Contact your IT department and ask them to allow outbound HTTPS to *.backblazeb2.com, then re-run the command.
01
Retrieve your key from Openda
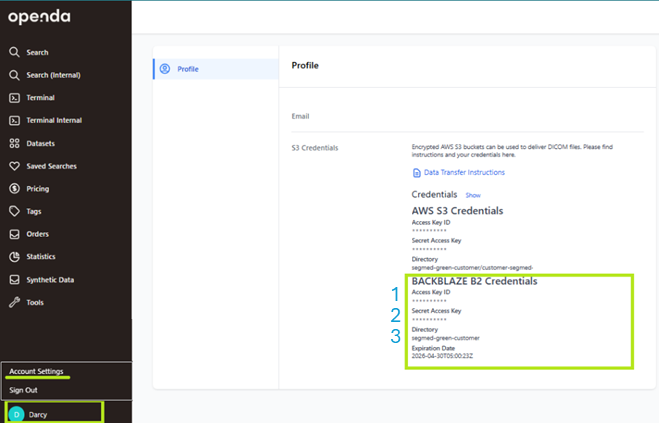
Sign in to Openda and open Account Settings → Profile. Find the Backblaze B2 Credentials section near the bottom of the page. You'll need three values from there, marked ①②③ in the screenshot:
Enter the values below to generate your commands. Your values stay in this browser — nothing is sent anywhere.
02
Create an authentication profile
Run this command in your terminal:
Terminal
aws configure --profile segmed-b2
When prompted, enter the following:
- AWS Access Key ID — enter ① above —
- AWS Secret Access Key — enter ② above —
- Default region name leave empty, press Enter
- Default output format leave empty, press Enter
B. Connecting to Backblaze with Cyberduck
Before you start
Install Cyberduck
Cyberduck is a free file-transfer app for Mac and Windows. If you already have it installed, you can skip ahead. Otherwise, download it for your operating system:
macOS
Download the free installer from cyberduck.io, open the .zip, and drag Cyberduck into your Applications folder.
Or with Homebrew:
brew install --cask cyberduck
Windows
Download and run the free installer from cyberduck.io.
It's also available in the Microsoft Store.
Linux
Cyberduck isn't available for Linux.
Please follow our companion guide, Connecting to Backblaze with the AWS CLI, instead.
To confirm it's installed, open Cyberduck. You should see a mostly empty window with an Open Connection button in the top-left corner.
00
Confirm network access
Before anything else, make sure your network allows connections to Backblaze. Click the link below (or copy it into your web browser's address bar):
Open in your browser
If you see this, you're good
<Error><Code>AccessDenied</Code>…
A short page of code mentioning an error like AccessDenied means your network can reach Backblaze — the server is rejecting an unauthenticated request, which is expected. Proceed to Step 01.
If you see any of these, you're blocked
This site can't be reachedConnection timed out- A certificate or privacy warning
- A corporate login or "site blocked" page
- The page spins for more than ~30 seconds
Contact your IT department and ask them to allow outbound HTTPS to *.backblazeb2.com, then try the link again.
01
Retrieve your key from Openda
Sign in to Openda and open Account Settings → Profile. Find the Backblaze B2 Credentials section near the bottom of the page. You'll need three values from there, marked ①②③ in the screenshot:
Enter the values below and this guide will show you exactly what to type into Cyberduck. Your values stay in this browser — nothing is sent anywhere.
02
Open a connection in Cyberduck
Open Cyberduck and click the Open Connection button in the top-left corner of the window. A dialog appears. Fill it in exactly as shown below — the preview updates automatically as you fill in the fields above.
Protocol (dropdown at the top)
Amazon S3 ▾
Server
s3.us-east-005.backblazeb2.com
Port
443
Access Key ID
— enter ① above —
Secret Access Key
— enter ② above —
▾ More Options (click to expand — don't skip this!)
Path
— enter ③ above —
Step by step:
- Protocol dropdown (top of dialog) change to Amazon S3
- Server s3.us-east-005.backblazeb2.com
- Port 443 (should already be filled in)
- Access Key ID — enter ① above —
- Secret Access Key — enter ② above —
- More Options → Path — enter ③ above —
The Path field is easy to miss but essential. Click the small More Options toggle at the bottom of the dialog to reveal it, then enter your directory from ③. Without it, Cyberduck tries to list every directory on the server — which your key isn't allowed to do — and you'll see an "Access Denied" error even though your credentials are correct.
Once everything matches the preview, click Connect. If Cyberduck asks whether to save the password in your keychain or credential manager, it's safe to say yes — it saves you re-typing the key next time.
03
Download your data
After connecting, Cyberduck shows your directory's contents like a normal file browser. To download everything:
- 1. Select all files Edit → Select All (⌘A on Mac, Ctrl+A on Windows)
- 2. Start the download right-click → Download To… → choose a folder
- 3. Watch progress the Transfers window opens automatically
To download only specific files or folders, just select those instead — or drag them straight from the Cyberduck window onto your desktop or into a local folder.
If a transfer is interrupted, don't worry: open the Transfers window (Window → Transfers), select the stopped transfer, and click the resume (↻) button. If Cyberduck asks what to do with files that already exist, choose Resume — it will skip everything that already finished and pick up where it left off.
Tip for next time: after connecting once, choose Bookmark → New Bookmark and your connection is saved. From then on, opening Cyberduck and double-clicking the bookmark takes you straight to your data.
If something goes wrong
Troubleshooting
Access Denied immediately after clicking Connect setup
This is the most common issue, and it's almost never your credentials. It usually means the Path field was left empty, so Cyberduck tried to list every directory on the server — which your key isn't allowed to do.
- Re-open the connection, click More Options at the bottom of the dialog, and enter your directory from ③ in the Path field.
- Double-check the Path matches the Directory shown in Openda exactly, including any hyphens or numbers. Don't add
s3://or any slashes at the start.
Login failed or repeated password prompts credentials
Your credentials weren't accepted. A few things to check:
- Make sure you copied the Backblaze B2 Credentials, not the AWS S3 Credentials shown above them in Openda — they look similar but aren't interchangeable.
- Re-paste both keys, watching for accidental whitespace at the start or end. Pasting into the fields in Step 01 of this guide will strip stray spaces for you — then copy the cleaned values from the preview.
- Check the Expiration Date shown beneath the credentials in Openda. If it's in the past, contact your Segmed representative for fresh credentials.
Connection failed or the connection times out network
Your machine can't reach Backblaze — this is a network issue, not a Cyberduck issue. Re-run the browser check from Step 00. If it fails, contact your IT department and ask them to allow outbound HTTPS (port 443) to *.backblazeb2.com. If you're on a corporate VPN, try disconnecting briefly to confirm whether the VPN is the cause.
Certificate warning when connecting network
This usually means a corporate firewall or antivirus is intercepting HTTPS connections (TLS inspection). Don't click through the warning — contact your IT department. They may need to add Backblaze to a TLS-inspection exclusion list, or install a corporate root certificate on your machine that covers Backblaze traffic.
Empty window or "Listing directory failed" after connecting setup
You connected, but you're not looking at the right place. Check that the Path in your connection matches the Directory from Openda character-for-character. If you saved a bookmark earlier with a wrong or missing Path, right-click the bookmark → Edit Bookmark and fix the Path there.
Transfer stops partway through or seems stuck runtime
For large datasets, downloads can take hours and may pause briefly between files — this is normal. If a transfer has actually stopped, open Window → Transfers, select it, and click the resume (↻) button. When asked what to do with existing files, choose Resume — already-completed files are skipped, and partial files continue from where they stopped.
Still stuck? Reach out to your Segmed contact with a screenshot of the exact error message from Cyberduck.
Copied to clipboard
If you have any questions, don’t hesitate to reach out to us at support@segmed.ai, or schedule a quick chat - we’d love to help you!


